A recipe for a ruby CLI tool
Published: Sun, Jan 10, 2021
NutritionAnalyzer repo on GitHub
Ingredients
- 1 idea
- 1 API or information rich website
- 1 programming language (Ruby)
Tools
- IDE
- API key
- Gems (various) as needed
- Ruby bundler
- RSPEC
- Digital programmer's notebook
Instructions
1 Identify a need 2 Generate requirements 3 Design 4 Develop MVP 5 Assess and seek feedback
Doing lessons and making a project from scratch are two separate things entirely. With a lesson using BDD (behavior driven design) tests from an test suite, the focus is solely on getting a system to work by satisfying a series of behavioral expectations. You sees a test and its expected output. You figure out what behavior satisfies that test then move onto the next test. After a while you have a complete, working system. You do not need to know how the system works as a whole to accomplish this.
With your own project, you are handed some basic requirements and you need to figure out these behaviors that satisfy them. Because of this, unless the task is blaringly simple, it is best to approach it in a formulaic manner. That is where the recipe above comes into play. These instructions can be applied to successfully design, develop, and implement a successfully project.
1. Identify a need
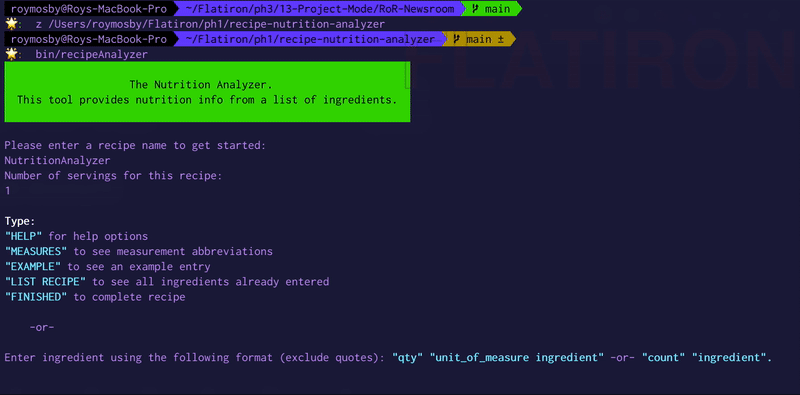
Since I do a lot of cooking and have a growing list of recipes, I thought it would be useful to make a tool get the nutrition information for each recipe. I can include it with the recipe so I can make healthful decisions on what I cook. This project will need to pull information from the internet and then display it to a command line interface (CLI). This information could originate from a web page (web scraping) or use an application programming interface (API). EDAMAM has a very handy API that uses natural language processing to read through a list of ingredients with measures then return nutrition information.
2. Generate requirements
Requirements come from a variety of sources and listing them out informs how a developer designs their system. They may be project constraints. For this project, it must:
- be done in Ruby
- follow object oriented programming (OOP) principles
- use an API or scrape a site for information
- provide an interactive CLI
Requirements also come from the project's objectives; what it needs to be able to do. This project needs to:
- accept a list of ingredients and number of servings
- provide nutritional information on a list of ingredients
With these requirements, I understand better how to start designing my system.
3. Design
Before I even start to code, I design my system. Since I am a visual learner, this means that I usually start with diagrams. This allows me to think about the system at a high level and to identify how its different components. Since this project follows OOP principles, I brainstorm the steps that need to be performed and what should be responsible each. Even though they are not a part of my code, I include the user and the API while thinking about these tasks. After all, they both do and expect certain certain items from the code.
After some thought, I divided my code into 3 classes: CLI, Recipe, and Fetcher. Each one of these classes will have a single instance initiated to make the program function. The CLI is responsible for printing out text to the CLI and accepting input from the user. The Recipe is an intermediary that contains, validates, passes information between the CLI and the Fetcher. Finally a Fetcher object interfaces with the EDAMAM API.
"Diagram detailing the classes in the methods and how they interact in the system."
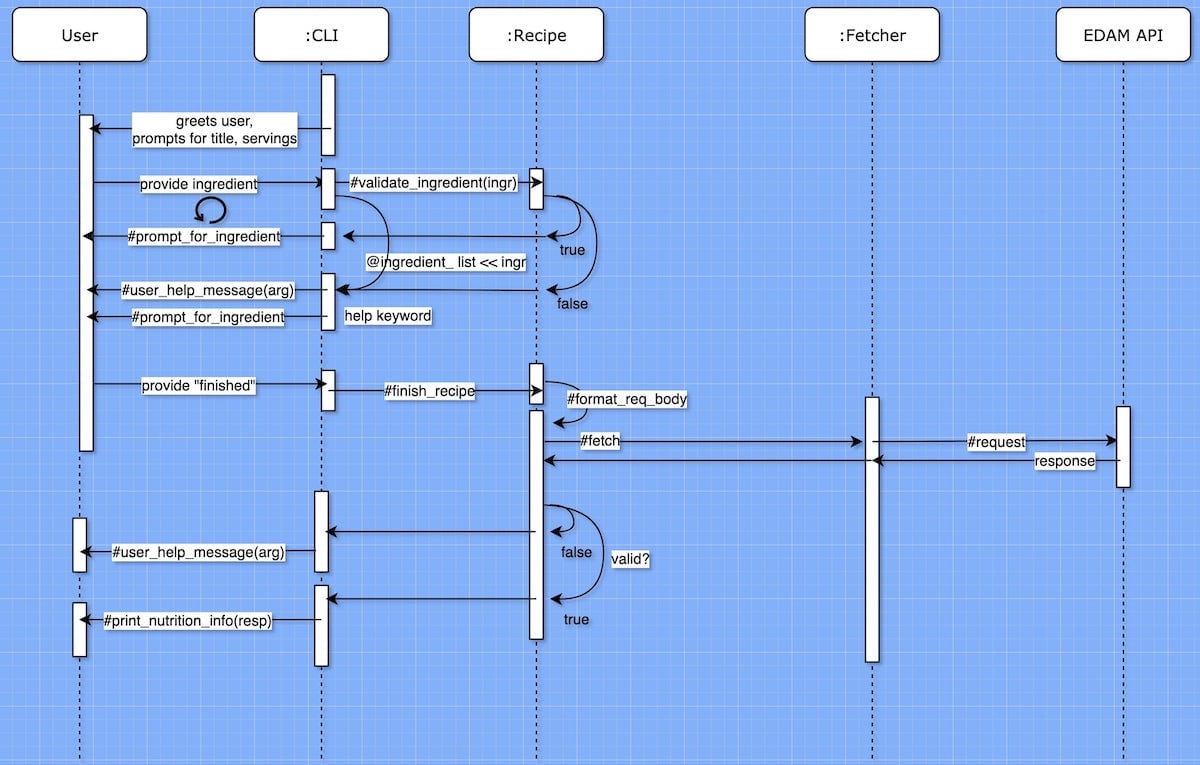
After fleshing out a sequence diagram, I determined what other code I needed to depend upon to assist my coding efforts. In the Ruby world, other code that you can bring into a project are called "Gems". These gems provide functionality so you do not have to write it yourself. References to these gems gets added to a gemfile. This list tells Ruby's bundler what to install when working with a project.
5. Develop
This is where the coding begins! The goal of this step is to create a minimum viable product (MVP). While a developer may get ideas along the way about new functionality, it's vital to get a project working. Keep a list of those ideas and get back to them later- you may have a different perspective on the feature afterwards. I start fleshing out my code based on the diagram I already created. I establish the classes and then implement the steps that I envisioned the code needed to take to accomplish its tasks. A few times I ran across a step that does not work or needs to be be broken down further. At that point, it is okay to revise the initial design. Once something works, it is a good idea to update the original design.
6. Assess and seek feedback
The MVP is done. It works! Now is the time to step back and have someone else test-run the program. While it may work, there is always room for improvement. Perhaps the instructions are confusing. A user may enter information in an unexpected way. A code review may also provide better code organization strategies and reveal different approaches to tasks executed by code. Act on that feedback. The joy of programming is that solution to problems can take a variety of forms. It is also a good time to go back to that list of ideas...

I'm open to work!
- Hi all! I am seeking a remote engineer position that can leverage a unique history of IT experience with several years of developing web applications.
- I've worked most recently with JavasScript, TypeScript, Python, PHP, and Ruby but am game to learn other scripted languages.
- Most importantly, I am all about making positive impact at organizations that see inclusivity as a strength rather than an obligation.
If you have room on your team and need someone that can contribute beyond just code, hit me up!